
 Pin it
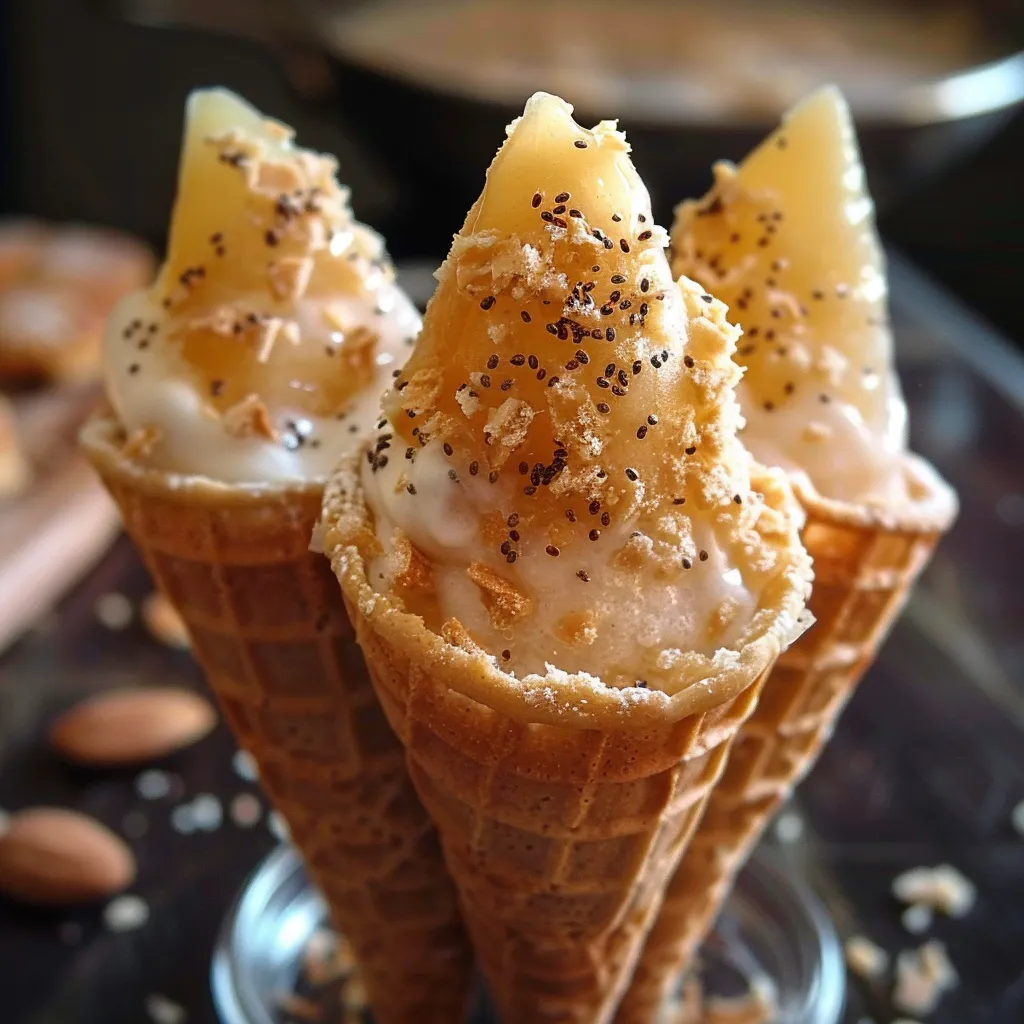
This homemade maple taffy cone takes a classic Quebec treat and turns it into a fancier dessert you can whip up right at home. Crisp cones you make yourself filled with real maple taffy bring the full sugar shack vibe anytime you want it, no matter the season.
The first time I put out these cones at a friend hangout, jaws dropped. It brought everyone straight back to childhood. Now, it’s my go-to treat for special family days.
Tasty Ingredient List
Waffle Cones- All-purpose flour: keeps your cone crispy and sturdy enough to hold maple filling
- Ground chia seeds: these bind the dough together (think of them as a natural egg swap) and sneak more nutrients in
- Plain unsweetened applesauce: gives a bit of sweet moisture so your dough doesn’t dry out
- Coconut oil: makes your cones delicately textured with a tiny hint of tropics
- Honey and cane sugar: team up for just the right sweetness and a nice golden color
- Vanilla extract: brings all the flavors together in a smooth way
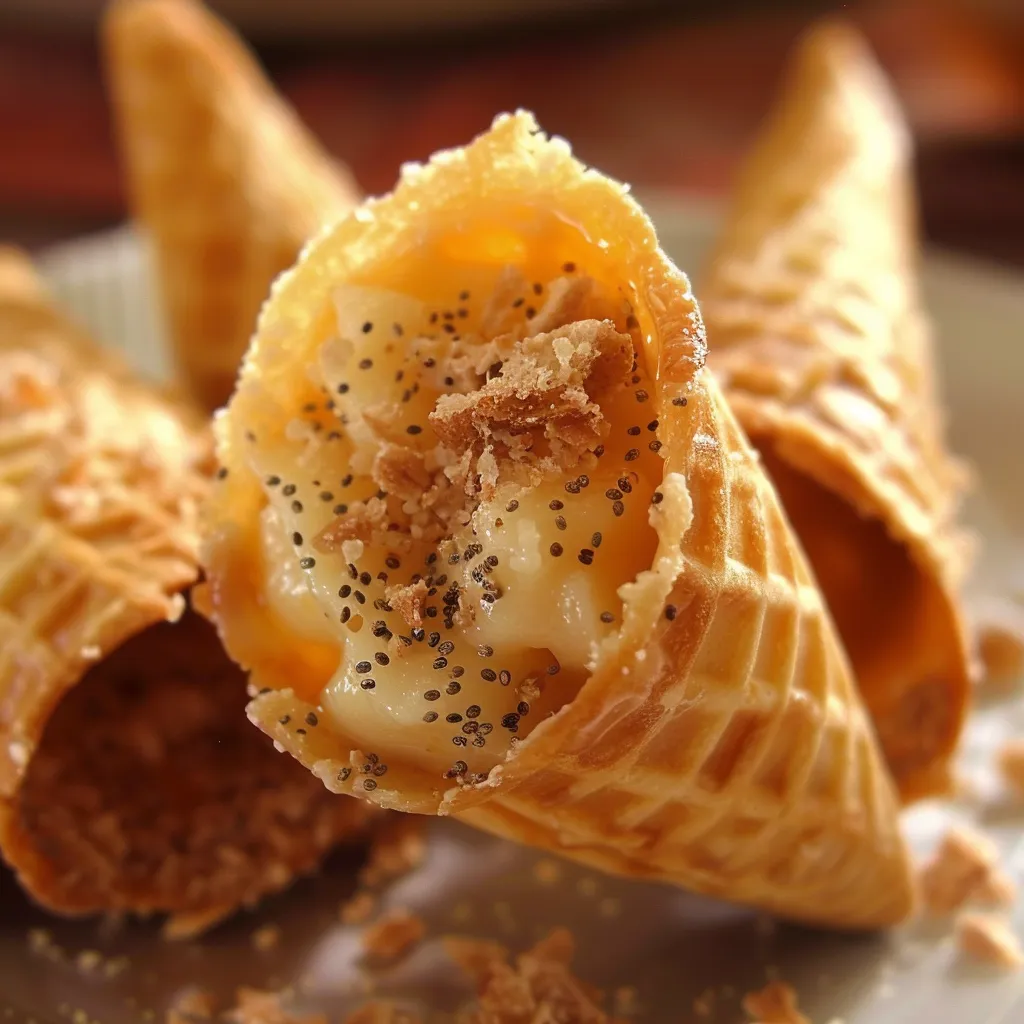
- Pure maple syrup: this one’s non-negotiable—pick a seriously good syrup for the real deal taste
- Maple butter: a creamy layer on top finishes it off with some extra smoothness
- Pecans or any nuts: throw these on for crunch—they’re the perfect contrast to all that sweetness
Easy Step-by-Step Directions
- Get the cone dough going:
- Start by stirring the flour with a little salt in a small bowl—it helps get everything even. Grind chia seeds really fine (a coffee grinder works great) until powdery. Whisk the chia powder into applesauce and some water in a big bowl, give it five minutes. You’ll see it forms a jelly-like mix that works just like eggs do here.
- Mix in the wet stuff:
- Put honey, cane sugar, melted coconut oil, and vanilla right into that chia mixture. Blend with a hand mixer for about a minute until smooth and a bit bubbly. Add the flour blend with a wooden spoon—just until you’ve got a dough and there are no dry pockets left. Don’t overmix it or your cones lose their snap.
- Bake up the cones:
- Heat your waffle cone maker till it’s nice and hot. Drop two teaspoons batter in the middle, close the lid tight. Cook ’em about 3 minutes, peeking to see if they’re golden brown. Everyone’s maker is a little different, so keep an eye out. The cone should be flexible enough to roll, but not doughy.
- Shape the cones:
- You’ve got to move quick here! As soon as a cone comes off hot, lay it on a dry towel and wrap it right away around a pastry tip or cone form. The towel keeps you from burning your hands while you squeeze it tight. Hold it a few seconds so it stays in shape, then gently pull the cone off and let it cool on a rack. Just keep going till you run out of dough.
- Make the maple taffy:
- First, figure out your boiling point by checking water with your thermometer. Boil water and note the temp (Fahrenheit). Add 26 degrees to that—that’s your maple target. Pour maple syrup in a large pot, bring it to a steady boil while watching the temp closely. Getting this right is super important for good taffy.
- Turn syrup into taffy:
- Once the syrup hits your number, take it off the heat. Pour some into a measuring cup. Leave the rest in a small bowl for five minutes. Meanwhile, stand your cones upright in popsicle molds or a cone box. Stir the syrup left in the bowl hard with a wooden spoon till it gets soft and thick—not sticky. Roll little balls from this and push them into the bottoms of each cone so you’ve got a leak-proof base.
- Fill the cones:
- Chill the cones for a few minutes till cold, then pour in the hot maple syrup from your measuring cup as it starts to thicken a bit. If it’s still runny after 25 minutes, put it back on the heat and bump the temp a few degrees. Let the filled cones cool in the fridge for around two hours so the taffy sets up for good.
- Finish it all off:
- Let your maple butter soften at room temp (about 15 minutes) after coming out of the fridge. Smear a little on top of each cone, then add a nut if you want. Chill again before serving so everything holds together just right.
Every corner of Quebec has its spin on this iconic sweet, each with their own little secrets for how gooey or firm the taffy turns out. My grandma always tossed in a pinch of salt to balance the maple’s sweetness. That little detail changes everything, making it go from just sweet to full-on complex.
 Pin it
Storage Tips and How Long They Last
When you’re done, stash the cones in a sealed container in the fridge—they’ll keep great for a week. Make sure they’re completely cooled before putting them away so steam doesn’t make them soggy. If you want to freeze them, just wrap each one in wax paper and then pop them in a freezer bag. They’ll be good for up to three months. Take them out half an hour before you want to dig in.
Possible Swaps
This treat’s super flexible for swapping things up. If you want a more old-school taste, use melted butter instead of coconut oil. Need gluten-free? Try your favorite gluten-free flour blend plus a little xanthan gum. You can change the honey to maple syrup for extra maple-ness or agave for a vegan spin. The texture might shift a bit, but it’ll still be yum.
Backstory of Maple Taffy
Maple taffy has been a big deal in Quebec for hundreds of years. Local first nations taught early settlers how to tap and boil maple sap. Traditionally, taffy gets poured onto snow at spring parties in sugar shacks. Our cone version is just a modern twist that lets you enjoy this treat all year. Every bite carries that mix of heritage and sharing.
Pro Tips
- Get all your tools and molds set up before you bake the cones since they firm up crazy fast
- Pick a Grade A dark maple syrup for bold, real-deal flavor
- Want crisp cones? Make sure every batch is deep golden before taking it out of the waffle maker
Frequently Asked Questions
- → What's the secret to perfect maple taffy?
Start by noting the boiling water's temperature. Then, add 26°F to that number to find your maple syrup's target temperature. This precision gives the taffy a flawless texture.
- → Can I prep the waffle cones in advance?
Absolutely! Make the cones early and store them in an airtight container to keep them crispy until you're ready to fill them.
- → How can I stop the taffy from leaking in the cone?
Sprinkle maple sugar in the bottom and chill the cones before adding the hot taffy. This helps it set faster.
- → Can I use a syrup other than maple?
You could swap it for another syrup, though it won't have that one-of-a-kind maple flavor.
- → How long do these cones last?
They'll stay fresh in the fridge for about a week, or you can freeze them for longer storage.