
 Pin it
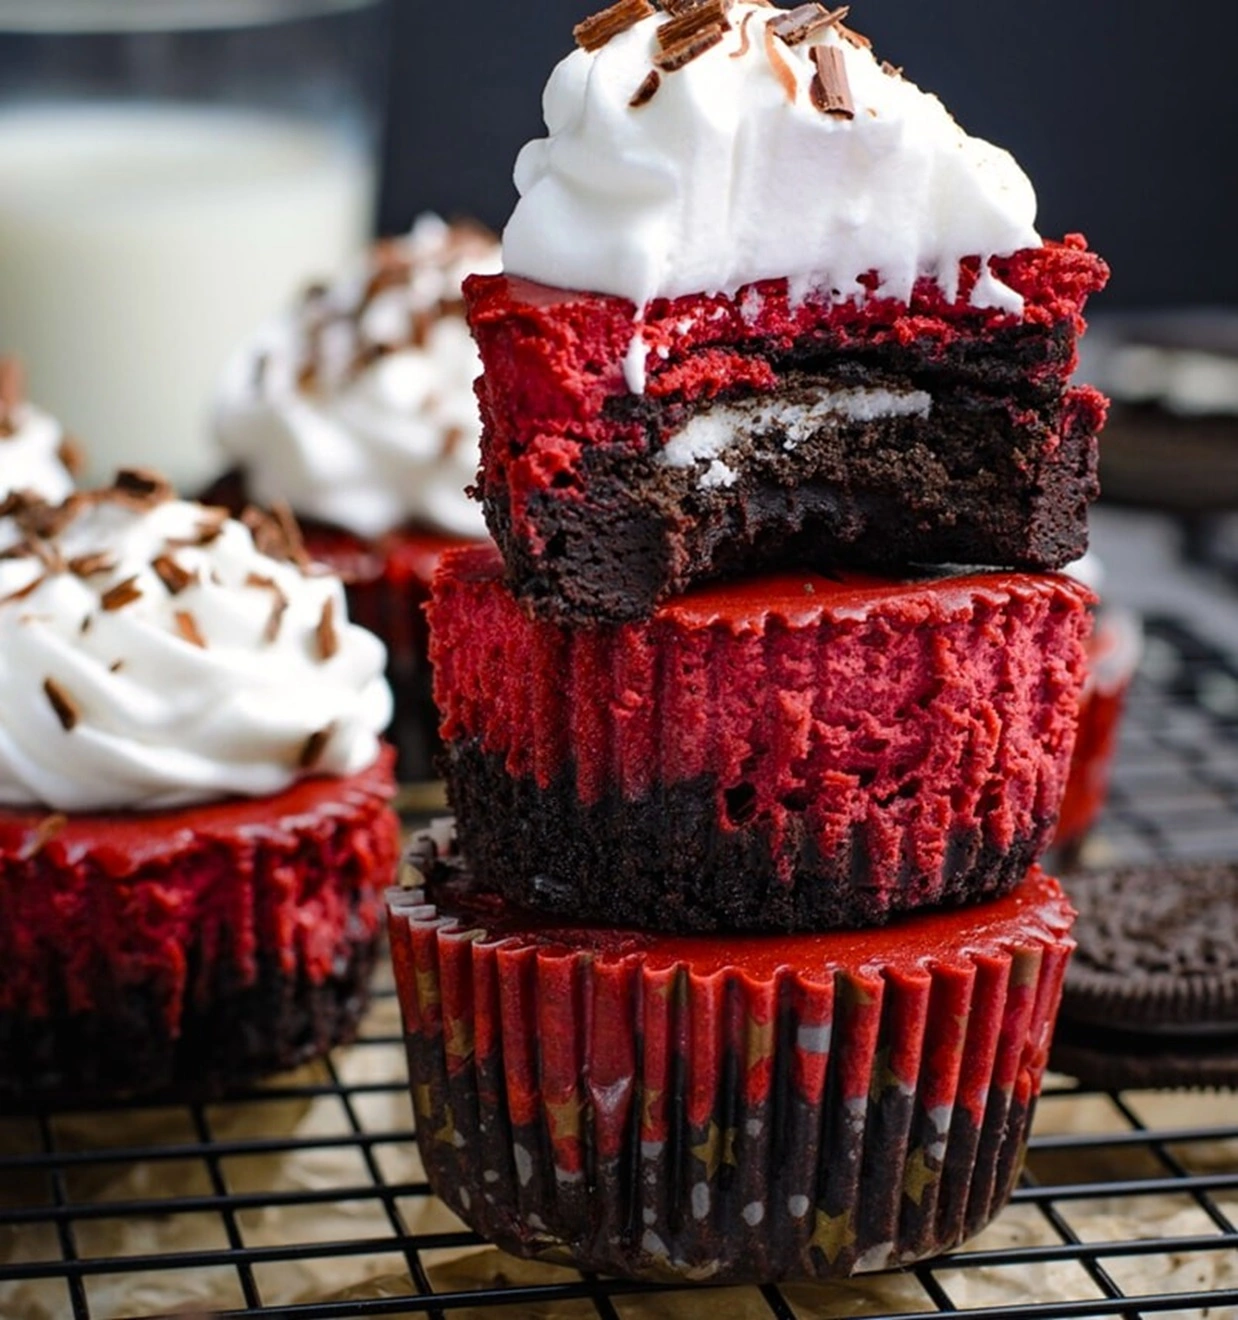
This decadent mini red velvet cheesecake recipe combines three dessert favorites into one irresistible bite-sized treat. The fudgy chocolate brownie base cradles a hidden Oreo surprise, topped with a vibrant red velvet cheesecake layer and finished with a swirl of Cool Whip. Perfect for special occasions or whenever you need to impress guests without the commitment of a full-sized dessert.
I made these for my sister's birthday gathering last weekend, and they disappeared faster than any dessert I've ever served. Even my brother-in-law, who claims he "doesn't do sweets," ate two of them!
Ingredients
- All purpose flour: 3 tablespoons Provides structure to the brownie base without making it too dense or cakey.
- Cocoa powder: 1/2 cup + 1 tablespoon Divided between the crust and filling this gives both components that classic chocolate flavor. Choose Dutch processed for smoother taste.
- Granulated sugar: 3/4 cup total Sweetens both layers perfectly without overwhelming the other flavors.
- Unsalted butter: 1/4 cup melted Creates richness in the brownie base. Make sure it's just melted not hot.
- Eggs: 2 Act as binders for both layers. Room temperature eggs incorporate much better into batters.
- Vanilla extract: 1 teaspoon Enhances all the other flavors. Pure vanilla extract makes a noticeable difference.
- Salt: pinch Brings out the sweetness and chocolate flavors. Don't skip this!
- Oreo cookies: 12 The surprise center element. Regular Oreos work best though Double Stuf can work in a pinch.
- Cream cheese: 8 oz The heart of the cheesecake layer. Philadelphia brand consistently gives the smoothest results.
- Sour cream: 1/4 cup Adds tang and creaminess to the cheesecake layer.
- Red gel food coloring: Gel colors provide vibrant red without thinning the batter. A little goes a long way.
- Cool Whip: 8 oz For the topping. Must be fully thawed before piping.
- Chocolate shavings: For garnish. Use a vegetable peeler on a chocolate bar for easy shavings.
Step-by-Step Instructions
- Step 1:
- Prepare Your Work Area Preheat your oven to 350°F. Line a standard 12 cup muffin tin with paper liners making sure they're pressed firmly into each cavity. Have all ingredients measured and ready before starting especially ensuring room temperature items have properly warmed up.
- Step 2:
- Create the Brownie Base In a medium bowl thoroughly whisk together 3 tablespoons flour 1/2 cup cocoa powder and that pinch of salt until no lumps remain. In a separate larger bowl vigorously whisk the 1/2 cup sugar and 1 egg for a full 2 minutes until the mixture becomes noticeably lighter in color and slightly foamy. Pour in the melted butter and 1/2 teaspoon vanilla whisking immediately to combine. Now fold in your dry ingredients using a rubber spatula making gentle figure eight motions until just combined overworking will create tough brownies.
- Step 3:
- Portion and Pre Bake the Crust Using a cookie scoop or tablespoon divide the brownie batter evenly among the 12 muffin cups about 1 tablespoon per cup. The batter will be thick so use the back of a spoon dipped in water to spread it evenly across the bottom of each liner. Bake for exactly 5 minutes they'll still look underdone which is perfect. Remove from oven and immediately reduce the temperature to 325°F.
- Step 4:
- Add the Oreo Layer While the brownie bases are still warm but not hot about 2 3 minutes after removal gently press one Oreo cookie flat into the center of each partially baked brownie base. They should sink in slightly but not completely disappear into the batter.
- Step 5:
- Prepare the Red Velvet Cheesecake Mixture In a large bowl beat the cream cheese and remaining 1/4 cup sugar with an electric mixer at medium speed for 2 3 minutes until completely smooth and fluffy scraping down the sides of the bowl several times. Add the second egg sour cream and remaining 1/2 teaspoon vanilla beating at low speed until just incorporated. Sift in the tablespoon of cocoa powder to avoid lumps and mix until smooth. Start with 1/4 teaspoon of red gel food coloring mixing on low speed then add more as needed to achieve that classic red velvet color.
- Step 6:
- Assemble and Bake Carefully spoon or pipe the red velvet cheesecake mixture over each Oreo topped brownie base filling each cup about 3/4 full. Tap the entire pan firmly against the counter 3 4 times to release any air bubbles and level the surfaces. Bake at 325°F for 15 18 minutes until the edges are set but the centers still have a slight jiggle. Do not overbake they'll continue setting as they cool.
- Step 7:
- Cool and Decorate Allow the cheesecakes to cool completely in the pan for about 30 minutes then refrigerate for at least 1 hour or overnight for best flavor development. Once chilled transfer the thawed Cool Whip to a piping bag fitted with a star tip and pipe a decorative swirl onto each cheesecake. Finish with a sprinkle of chocolate shavings just before serving.
Pin it
My grandmother first introduced me to red velvet cake when I was just eight years old. She claimed it was "the only proper dessert for special occasions," and I've carried that sentiment with me ever since. My kids now request these mini cheesecakes instead of birthday cake every year, and I secretly love the tradition we've created around them.
Perfecting the Texture
Getting the ideal texture for these mini cheesecakes depends on several factors. The brownie base should be just firm enough to hold its shape but still maintain a fudgy quality when bitten into. This is achieved by partially baking it before adding the Oreo and cheesecake layers. The cheesecake portion requires room temperature ingredients to prevent lumps and ensure proper integration. I've found that even slight temperature differences can affect the final texture. When mixing the cheesecake batter, be careful not to incorporate too much air, which can cause cracking. The gentle tap of the pan before baking helps eliminate air bubbles that might otherwise expand and disrupt the smooth surface of your cheesecakes.
Make-Ahead and Storage Tips
These mini cheesecakes are perfect for planning ahead for special occasions. You can prepare them up to three days before serving if stored properly. Make the cheesecakes through the baking and cooling stages, then refrigerate them without the Cool Whip topping in an airtight container. The day of serving, add the whipped topping and chocolate shavings for the freshest presentation. If you need to store leftovers (though I rarely have any!), keep them refrigerated and consume within five days. For longer storage, these freeze exceptionally well without the topping. Place them in a single layer in an airtight container with parchment between layers if stacking, and they'll maintain quality for up to three months.
Variations Worth Trying
Don't hesitate to experiment with this versatile recipe base. I've created seasonal variations that have been just as successful as the original. For a festive holiday twist, add a drop of peppermint extract to the cheesecake layer and top with crushed candy canes instead of chocolate shavings. During fall, a pumpkin spice variation works wonderfully by replacing the cocoa in the cheesecake layer with pumpkin pie spice and adding 2 tablespoons of pumpkin puree. For chocolate lovers in your life, try using chocolate cream cheese and increasing the cocoa powder for an extra-rich experience. I've even made a white chocolate version by replacing the cocoa powder with white chocolate powder and using golden Oreos in the center. The possibilities are endless, and each variation maintains the perfect single-serving size that makes these cheesecakes so appealing.
Frequently Asked Questions
- → Can I prepare these Red Velvet Mini Cheesecakes in advance?
Totally! Prepping them a day or two earlier works wonders. Keep them refrigerated in a covered container. For the best outcome, add the whipped topping and final garnish right before serving.
- → Are these mini cheesecakes freezer-friendly?
Definitely! Store them in the freezer without the whipped topping for up to three months. Once thawed in the fridge, top with fresh whipped cream before serving.
- → What’s a good replacement for Cool Whip?
Try homemade whipped cream! Whip 1 cup of heavy cream with 2–3 tablespoons of powdered sugar and a splash of vanilla. For added stability, mix in a bit of bloomed unflavored gelatin if needed.
- → How do I know when they’re baked just right?
You’ll know they’re done when the edges firm up but the centers have a soft jiggle. Cool them on the counter, and they’ll firm up more over time. Avoid baking too long to prevent cracking.
- → Can I switch gel food coloring to regular?
Yes, but regular food coloring is less concentrated, so you’ll need to use more to get that bright red hue. Avoid adding too much liquid though – it might mess up the batter’s texture.
- → What can I swap Oreos with?
Plenty of options: use graham crackers, chocolate wafers, ginger snaps, or even shortbread cookies. Each one pairs wonderfully with the red velvet flavor for a slightly different twist.