
 Pin it
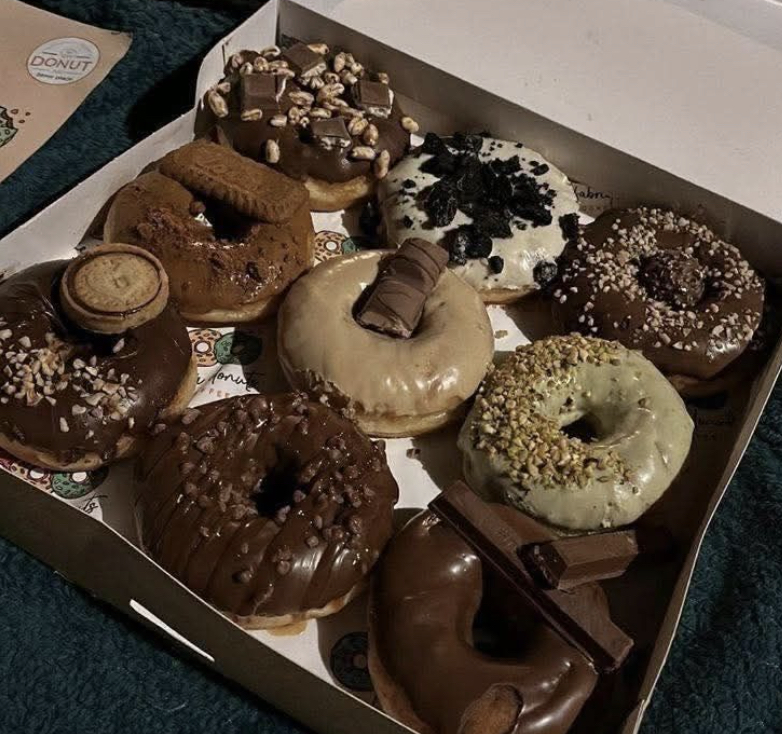
These oven-baked chocolate donuts hit the spot when you want something sweet without the mess of frying. They're packed with chocolatey goodness and finished with a velvety chocolate topping that rivals any bakery favorite. The soft, cake-like donuts keep that classic round shape with a hole, making them hard to resist whether it's breakfast, dessert, or just because you need that chocolate pick-me-up.
I whipped these up for a family get-together at my place, and they vanished quicker than anything else we served. My super fussy nephew actually begged me to make another batch before they headed home!
Deep Dive Into Components:
- All-purpose flour (1 cup/125g): Forms the base of your donuts; scoop with a spoon into measuring cups and level off for best results
- Unsweetened cocoa powder (1/4 cup/22g): Brings that chocolate kick; grab Dutch-processed for darker color and mellower flavor
- Baking soda (1/2 teaspoon): Makes your donuts puff up nicely
- Salt (1/8 teaspoon): Brings out chocolate notes and cuts through sweetness
- Buttermilk (1/2 cup/120ml): Keeps everything soft and moist while working with the baking soda
- Granulated sugar (1/2 cup/100g): Adds sweetness and helps create that soft donut texture
- Egg (1 large, room temperature): Holds everything together; warm eggs mix in better
- Butter (2 tablespoons/30g, melted): Adds that can't-resist richness
- Vanilla extract (1 teaspoon): Boosts chocolate flavor with its warm undertones
For the glaze:
- Powdered sugar (1 cup/120g): Makes the glaze silky and spreadable
- Cocoa powder (3 tablespoons/17g): Adds chocolate flavor while keeping the right consistency
- Vanilla extract (1/2 teaspoon): Gives the chocolate topping more dimension
- Milk (3-4 tablespoons/45-60ml): Controls how thick your glaze turns out; add more or less as needed
Tasty Creation Process:
- 1. Get Ready
- Turn your oven to 350°F (175°C). Give your donut pan a good coating of cooking spray, making sure to get the middle post too. This step really matters because these moist chocolate treats tend to stick. Don't have a donut pan? They're pretty cheap online and worth getting for that perfect donut shape.
- 2. Combine Dry Stuff
- Grab a big bowl and mix the flour, cocoa, baking soda, and salt together. Use a whisk to break up any cocoa clumps you spot. Getting this step right means nobody bites into a weird pocket of salt or baking soda.
- 3. Mix Wet Stuff
- In another bowl, throw together the buttermilk, sugar, egg, melted butter, and vanilla. Whisk it all up until it looks well mixed and a bit bubbly. Don't worry if the cold buttermilk makes little butter bits form – just keep mixing until it looks mostly smooth.
- 4. Make Your Batter
- Pour your wet mixture into the dry ingredients. With a rubber spatula, fold everything together just enough to mix it. This part's key – mix too much and you'll end up with tough donuts. Stop when you don't see any dry flour spots, even if the batter seems a bit lumpy.
- 5. Fill The Pan
- Scoop your batter into a piping bag (or a plastic bag with the corner cut off) and squeeze it into each donut shape. Fill them about 2/3 to 3/4 full so they have room to grow. No piping bag? Just use a spoon and smooth the tops when done.
- 6. Bake Them Up
- Put your pan on the middle shelf of your hot oven and bake for 8-10 minutes. You'll know they're ready when you can touch the top and it bounces back, or when a toothpick comes out clean. Watch the time – leave them too long and they'll dry out.
- 7. Let Them Rest
- Let the donuts sit in the pan for about 5 minutes after baking. This helps them firm up so they come out easier. Then flip them onto a wire rack. If they're stuck, run a knife around the edges to help free them.
- 8. Whip Up The Glaze
- While they cool, mix the powdered sugar and cocoa in a medium bowl. Add the vanilla and 3 tablespoons of milk, then whisk until smooth. The glaze should coat a spoon but drip off slowly. Need it thinner? Add milk a tiny bit at a time.
- 9. Add The Topping
- When the donuts are totally cool, dip the tops in the chocolate glaze and let extra drip off. Put them glaze-side up on the rack. Want sprinkles or other fun stuff? Add them right away while the glaze is wet. Wait about 15-20 minutes for everything to set before digging in.
My grandma always told me chocolate fixes the soul, and I think about her whenever I bake these donuts. My little girl has picked them as her birthday morning treat three years in a row now, and seeing her happy face smudged with chocolate makes my day complete.
Common Problems Solved
New bakers sometimes run into snags with donuts. If yours turn out heavy instead of light, you probably mixed the batter too much or packed too much flour in your measuring cups. Try spooning flour into your cups instead of scooping straight from the bag, which packs it down too tight. Another common headache is donuts sticking to the pan – always go overboard with non-stick spray, even with supposedly non-stick pans.
Fun Twists To Try
These chocolate donuts work great as a starting point for tons of tasty changes. Toss in 1/2 cup mini chocolate chips for extra chocolate goodness, or swap the chocolate glaze for peanut butter topping to create a flavor like those famous peanut butter cups. During Christmas, I love adding crushed candy canes or holiday sprinkles on top. For a coffee-chocolate combo, mix a teaspoon of espresso powder into both the batter and glaze – it makes the chocolate taste even deeper with a grown-up coffee hint.
Keeping Them Fresh
These homemade treats taste best right after making them, but you can keep them in a sealed container on the counter for up to two days. Want to save them longer? Freeze the unglazed donuts in a freezer container with parchment paper between layers for up to three months, then thaw them at room temp before adding glaze. You can also mix the batter the night before, stick it in the fridge in a covered bowl, and let it warm up before baking in the morning – perfect for special breakfasts when you don't want to mess around with measuring cups first thing.
Frequently Asked Questions
- → Is it possible to make these without a donut pan?
Yes! If you don't own a donut pan, use a mini muffin tin to create donut 'holes' or try a standard muffin tin for bigger portions. Just keep an eye on them—mini muffins take about 7-9 minutes, whereas regular muffins need around 12-15 minutes to bake.
- → What can I use instead of buttermilk?
If you're out of buttermilk, mix 1/2 tablespoon of lemon juice or vinegar into 1/2 cup of milk and let it sit for a few minutes to thicken. You could also thin some plain yogurt with a splash of milk as an alternative.
- → How should I keep these donuts fresh?
Once the donuts cool completely, store them in an airtight container at room temperature for two days. To keep them a little longer, refrigerate for up to five days. If you want to save unglazed donuts for later, freeze them for up to three months and coat them in glaze after thawing.
- → Can they be made without dairy?
Absolutely! Swap butter for melted coconut oil or plant-based butter. For buttermilk, use your favorite non-dairy milk with 1/2 tablespoon of vinegar. Replace the milk in the glaze with almond or any other dairy-free option.
- → What are some other topping ideas?
Take it up a notch with extras like chopped nuts, mini marshmallows, crushed cookies, or shredded coconut. A drizzle of caramel, peanut butter, or white chocolate could add some fun flavor too!
- → Why did my donuts turn out dry?
If your donuts feel dry, it’s likely from baking a little too long or adding too much flour. Be sure to use the spoon-and-level method for measuring flour instead of scooping from the bag. Start checking the donuts at the lower baking time since ovens can differ slightly.